In today’s digital age, having a strong visual presence is crucial for small business owners. However, not everyone has the budget or expertise to hire a professional graphic designer. That’s where Canva comes in. Canva is a user-friendly online design tool that empowers non-designers to create stunning visuals for their business. In this blog post, we will guide you step-by-step on how to save a print-ready file in Canva, ensuring your designs are ready for professional printing and don’t end up looking all pixelated and wacky as shit.
Step 1: Choose the right dimensions and resolution
Before diving into the design process, it’s essential to determine the correct dimensions and resolution for your print-ready file. Canva offers a wide range of predefined templates for various print materials like business cards, flyers, and posters. These templates are already set up with the correct dimensions for each specific print item. To access these templates, simply click on the “Create a design” button on Canva’s homepage and select the category that matches your print item.
When selecting a template, make sure it matches your desired print item. For example, if you’re creating a business card, choose a template specifically designed for business cards. This ensures that you will create your design in the correct size and aspect ratio.
Additionally, ensure that the resolution is set to 300 DPI (dots per inch) to ensure high-quality printing. Canva automatically sets the resolution to 300 DPI by default, so you don’t need to worry about adjusting this setting.
Step 2: Design your artwork
Once you’ve selected the appropriate template, it’s time to unleash your creativity and design your artwork. Canva provides an intuitive drag-and-drop interface with a vast library of elements, fonts, images, and pre-designed templates. The left sidebar of the Canva editor allows you to access various design elements and tools.
Experiment with different layouts, color schemes, and typography to create a design that aligns with your brand identity. Canva offers a wide range of fonts and allows you to customize the color palette to match your brand. You can also upload your own images or use the ones available in Canva’s library.
Remember to keep your design clean, legible, and visually appealing. Avoid cluttering the design with too many elements or using too many different fonts. Stick to a consistent color scheme that reflects your brand’s personality. Canva provides helpful design tips and inspiration along the way, so don’t hesitate to explore the resources available within the platform.
If you need more tips on the design part of it, make sure to check out How to Design Your Own Graphics Like a Pro.
Step 3: Incorporate bleed and safety margins
When preparing a print-ready file, it’s really important to keep bleed and safety margins in mind. These two things play a big role in making sure your printed materials look professional and top-notch. Forgetting about them could lead to important parts of your design getting chopped off or looking a bit wonky. So, always remember to give your designs that extra space they need to shine and stay intact when they come to life on paper!
Bleed
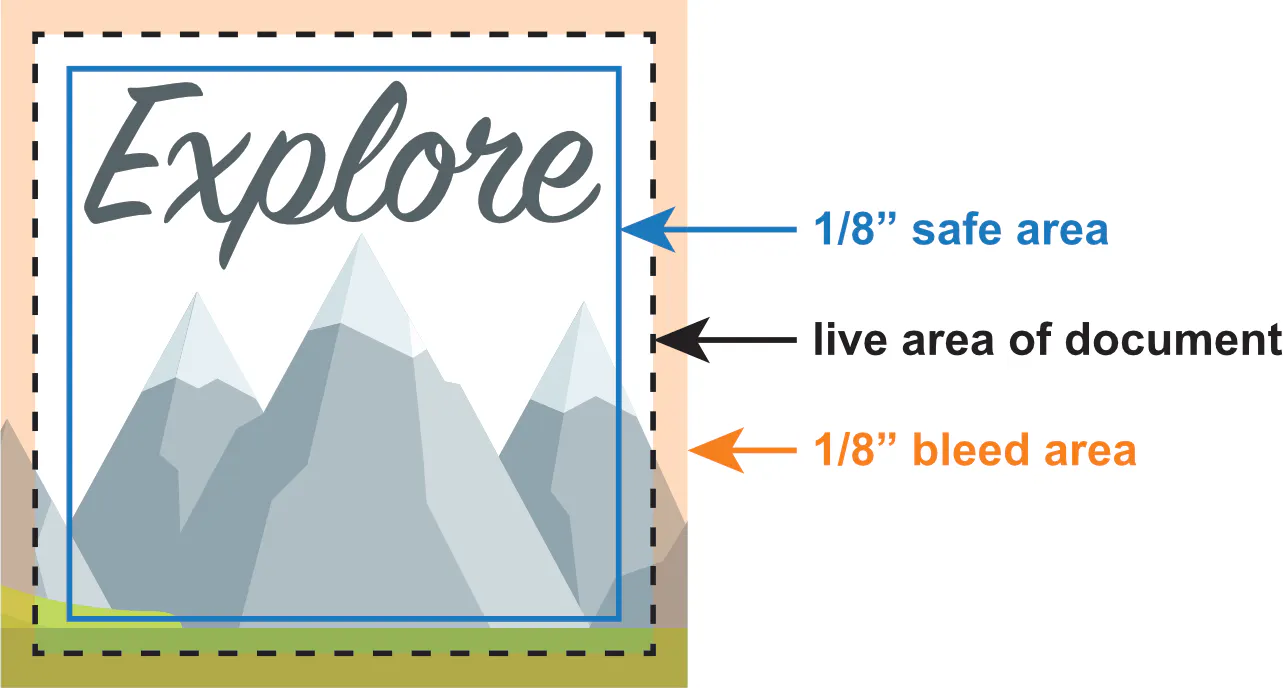
Bleed is the extended area beyond the edge of your design that ensures there are no white borders after trimming. Canva allows you to add bleed manually by increasing the dimensions of your design or by enabling the Show Print Bleed option.
To add bleed manually, go to the top menu and click on File. Then, select Page Setup from the drop-down menu. Increase the dimensions of your design to include the desired bleed area. For example, if your business card size is 3.5 inches by 2 inches, you can add a bleed area of 0.125 inches on all sides, resulting in a document size of 3.75 inches by 2.25 inches.
Enabling the Show Print Bleed option in Canva is a helpful feature that allows you to visualize the bleed area by displaying a red border around the canvas. It’s crucial to understand that you should never place any important elements, such as text or logos, within the bleed area, as this area is meant to be cut off.
Safety Margins
Additionally, you should avoid placing them too close to the edge of the document, within the safety margins. Safety margins act as a protective zone to ensure that important elements remain intact and are not at risk of being trimmed off during the printing process. Canva has visual guides to help you keep everything in check, so this is super helpful. As a general rule of thumb, you should make sure your important elements are at least 0.25 inches away from the edge of the document. That way, you’ll have a buffer zone to keep them safe and intact. Remember, nobody wants their precious logo or crucial text to be accidentally trimmed away!
By adhering to these guidelines, you can prevent the unfortunate scenario of essential content or design elements being cut off. This will help your final printed materials accurately represent your vision and message.
Both bleed and safety margins exist because printers are not able to cut every design perfectly, so most printers recommend a 0.125” cutting tolerance. Cutting tolerance is basically the wiggle room we give to account for tiny differences when we cut printed materials to their final size. Things like mechanical constraints, how the paper behaves, and all the little variables in printing and cutting account. We understand that it’s impossible to get every single cut absolutely perfect, so we allow for a little bit of variation within certain limits.

If this all still sounds confusing (trust me, I get it) here’s a visual explanation Smartpress put together, that might help you understand it better. If it’s still not making sense, feel free to comment or shoot me an email at hello@thenondesigner.co and I’ll be happy to go over it with you. 🙂
Step 4: Export as a print-ready PDF file
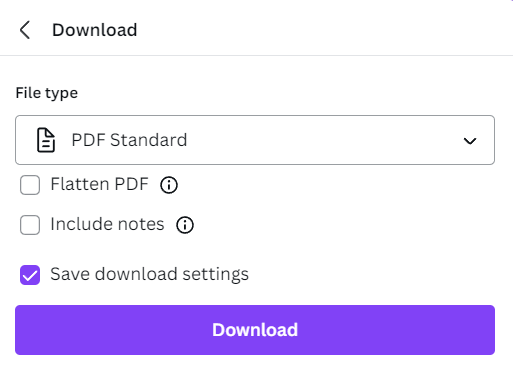
After you’ve finalized your design, it’s time to export it as a print-ready PDF file. Canva offers a variety of export options, but for professional printing, it’s best to choose the PDF option. To save your design as a PDF, click File in the top left corner and then Download. Click on the dropdown menu under file type (where it says PNG suggested) and change it to PDF Print. Now hit download and you’re done! Send this file to your printer and patiently wait to see how awesome it looks printed. 🙂

In a nutshell, Canva is a game-changer for non-designers who want to create professional print-ready files for their small businesses. It’s like having a design studio at your fingertips! By following the steps we’ve covered in this guide, you’ll be able to navigate Canva with ease and create eye-catching designs that are ready for print. From choosing the right dimensions to incorporating bleed and margins, Canva provides the features to help you achieve amazing designs. So, let your creativity flow, take advantage of Canva’s tools and templates, and dive into your design journey with confidence. You’ll be amazed at what you can achieve with Canva by your side. Happy designing!

