Are you looking for an easy way to make Canva PDF forms fillable? With Canva, you can design customized fillable PDFs even if you don’t have any design experience, but unfortunately, making them fillable is still not an option. In this post, I’ll walk you through the simple step-by-step process of designing a beautiful PDF form in Canva and making it fillable using PDFescape.
What are Fillable PDFs?
Before diving into the how-to, let’s clarify what fillable PDFs are. These are PDF documents with interactive fields that users can digitally complete without having to open them in specialized software like Canva. Think of forms, questionnaires, or applications – anything that requires data input. The beauty of fillable PDFs is that they save time and keep things digital, allowing recipients to easily fill out and submit these documents electronically.
Signing up for a Free Canva Account
First things first, if you’re not already using Canva, sign up for a free account. Canva is super user-friendly and offers plenty of templates and design tools to help you make impressive documents, including fillable PDFs. All you need is a free account, but they do offer a free 30-day trial if you want to check that out.
Designing a PDF Form
Ready to get started? Here’s a simple guide to designing a PDF form:
1. Choose a Template
Browse Canva’s presentation templates and select one suitable for a form. Since people might print these out, we suggest a standard paper size such as Letter (8.5”x11”) in the US or A4 (210 mm x 297 mm) in Europe. You can start from a blank document or browse through the template library so you don’t have to start from scratch. Look for layouts free of distracting elements and with enough white space to accommodate your form fields.
2. Customize the Design
Modify the template by uploading your business logo, brand colors and fonts to match your company’s style. Rearrange or delete any template visuals or text that aren’t needed. Edit the template by adding your own text, images, and visuals that fit your brand identity. For more tips on how to create eye-catching graphics, check out this post.
3. Add Form Fields
Now comes the crucial part – deciding what parts will be fillable. Since you won’t be able to make these fillable in Canva, make sure to create rectangles or leave empty space where you want people to type. Make sure to leave enough space, especially if you’re creating something like a workbook. If you want to add checkboxes, place small boxes as placeholders, leave empty space for drop down menus, etc.
4. Save as PDF
With your form complete, it’s time to save it as a PDF file. Click “Share” in the top right corner, click “Download” then select “PDF Standard” as the file format. This will save your file as a high-quality but lower size PDF that will be easy to upload and email.
Making the PDF Fillable
Now that you have it designed, it’s time to make your Canva PDF form fillable.
5. Add Fillable Fields
For this step, we’re going to head over to PDFescape. This is a tool that will make your Canva PDF fillable. We’re going to use the free online version.
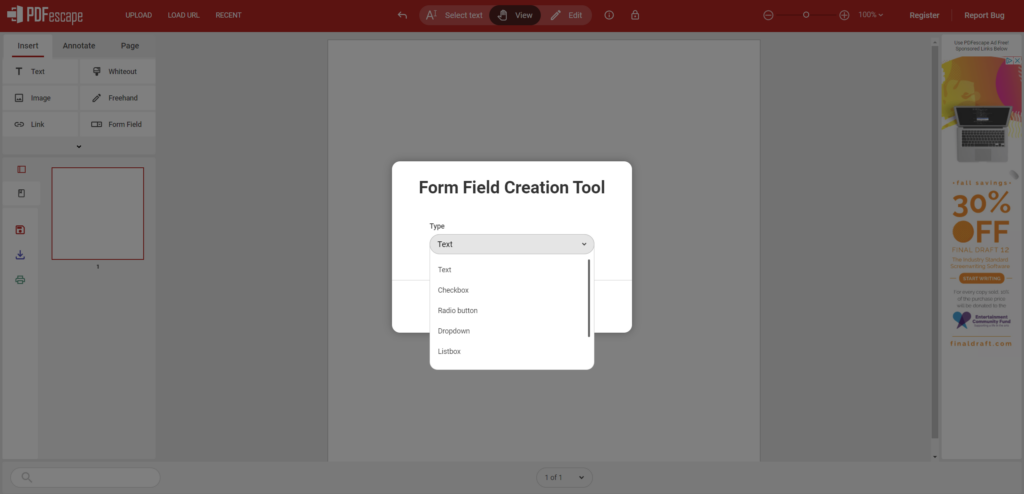
First, upload you Canva PDF to PDFescape. From here you’re going to click on “Insert” and then “Form Field”. A new window will pop up asking you what kind of field you want to add. Options include:
- Text Fields – Enable recipients to type in open-ended responses. Useful for collecting written answers or other text input.
- Checkboxes – Allow recipients to select multiple options by clicking small squares. Useful for multi-choice questions.
- Radio Buttons – Recipients can choose one option from a group by clicking the circle button. Only one selection can be made.
- Dropdown Menus – Display a collapsed list that opens when clicked to show choices. Recipients select one option. Saves space.
- List Boxes – Show a visible list of choices that recipients can select multiple options from. Similar to dropdowns.
- Reset Buttons – Clear entered information and restore form to blank state. Allows starting over if needed.
- Submit Buttons – Send completed form data for online forms. Won’t submit PDF forms.

For fillable PDF forms, you’ll most likely be using text and checkbox fields. Once you place the on the page you’ll still be able to edit the size and placement.
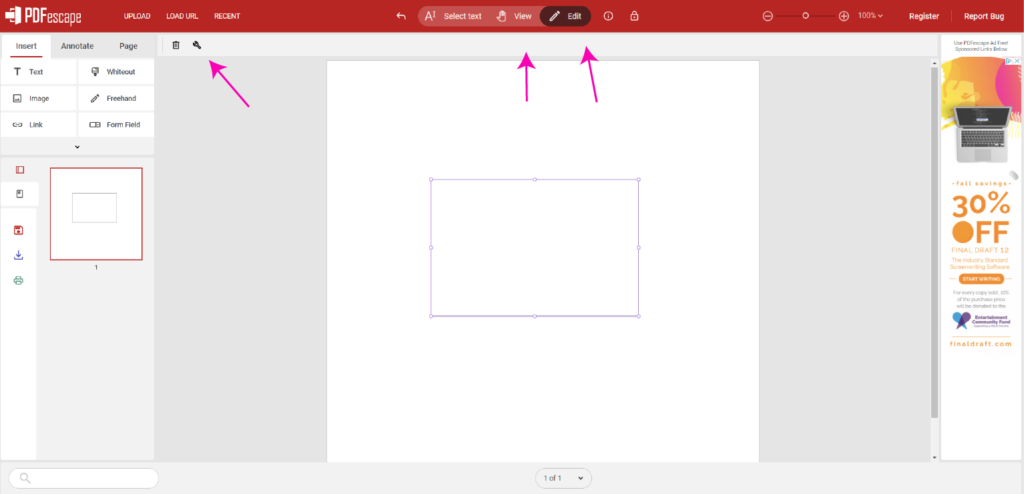
There are 2 modes that you’ll be switching between: View and Edit. View will show you what the PDF will look like once it’s saved and you’ll be able to fill things out to test it. Edit will obviously let you edit so you can go back and forth to see how things look and edit as needed.
Important:
While you’re in the edit mode, you’ll be able to edit individual fields by clicking the wrench icon in the top left corner of your document. You should select “Multi-line” for your text fields, so when people type inside the text boxes it doesn’t just keep it to one line.

6. Download your Fillable PDF
Click the download button on the left hand side to download your PDF. Don’t close the document in case you need to make any edits after you test it out.
7. Test your Fillable PDF
Open your new fillable PDF with a PDF reader app such as Adobe Acrobat or Preview. Try filling it out completely to make sure all the fields work as intended. If you run into any problems, go back to PDFescape and fix it.
Learning to make your Canva PDF Form fillable will help you serve your clients in a whole new way. This might seem like a lot if you’ve never done it before, but I promise it’s super intuitive and easy to learn. After you do it once, you’ll have no problem doing it again and you probably won’t even need to reference this post.

