Pinterest is a fantastic way to boost your blog’s traffic, but let’s be real, creating and scheduling Pinterest Pins one by one can take ages. That’s why in this blog post, I’ll show you how Canva can make this task a whole lot easier.
Even though I work as a professional graphic designer and have all the Adobe Creative Cloud tools at my disposal (like Photoshop and Illustrator), Canva’s simplicity is hard to overlook when it comes to creating social media posts. Even if you don’t have the PRO version and can’t schedule ahead, I suggest using Canva to design your graphics and share them individually as you create them. Canva has a ton of templates for all sorts of styles, so you’ll definitely find something that matches your aesthetic. Once your design is done, you can easily publish it without worrying about downloading, storing, and then publishing the graphic through Pinterest.
Here’s how Canva makes this process incredibly simple.
Design Your Pin
Start by selecting a Pinterest Pin template or begin with a blank canvas to craft your Pin. Ensure that you choose the correct dimensions, which currently stand at 1000x1500px. However, keep in mind that social media platforms may occasionally alter their graphic size requirements. If you use the “Pinterest Template” option in Canva, you can be sure that they have it up to date so you don’t have to worry about the size. Once it’s done and ready to publish move on to Step 2.
Link Your Pinterest Account to Canva
Before you get started, take a moment to double-check that you’re logged into the correct Pinterest account. If you’re juggling more than one, a quick check on Pinterest.com will do the trick. Canva’s going to connect with the one you’re currently logged into. To link ’em up, click “Share,” then “Share on Social,” and hit “Pinterest.”
Post or Schedule Your Pin
You have two options here:
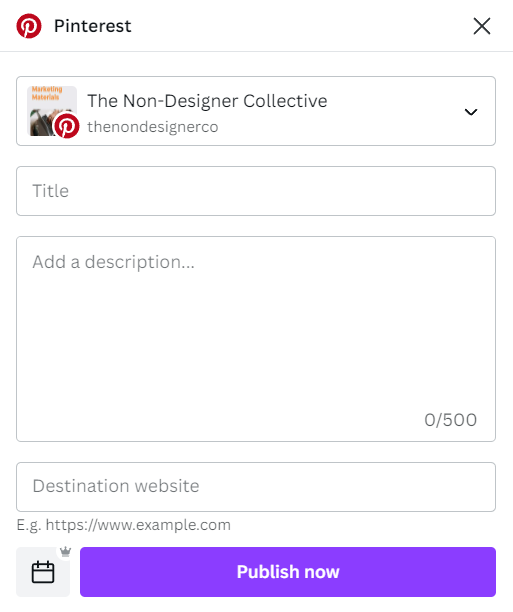
Publish Now: Once your Pinterest account is linked, click on “Share,” then “Share on Social,” and choose “Pinterest.” Here, you can select the board you want to share your Pin on, provide a title, description, and the URL destination for the Pin. After filling in these details, click “Publish Now,” and you’re all set!
Schedule: To use Canva’s social media scheduler and plan posts ahead of time, you’ll need a Canva PRO subscription. So if you’re using Canva PRO, you’re in for a treat. Canva’s social media scheduler lets you plan ahead. This feature is a real time-saver, allowing you to batch-create and schedule your Pins effortlessly. And if you need more reasons to consider Canva PRO, check out this blog post: Canva Free vs. Canva Pro: Is the Pro Version Worth It?
As a bonus, if you’re not quite ready to commit, Canva offers a free 30-day trial. It’s a great way to explore all the PRO features and see if they suit your needs.

So, whether you’re all in for immediate publishing or gearing up to take full advantage of Canva’s scheduler, the choice is yours. Even with the free version, you’ll save time on creating Pinterest Pins by skipping the download-and-publish routine. So go ahead, check it out, and give this time-saving Canva solution a try.

